Please Choose Your Language
close
Choose Your Site
Global
Social Media
Views: 0 Author: Site Editor Publish Time: 2026-08-28 Origin: Site


Drilling deep into thick timber often causes severe hand and arm strain for many craftsmen. You can eliminate this operator fatigue entirely by utilizing the core advantage of a self-feeding design. Unlike traditional twist bits, these specialized tools do the hard work for you.
Understanding exactly how this mechanism pulls itself through wood matters immensely for your workflow. It helps you evaluate whether your current power tools produce the necessary torque. It also ensures you choose the safest, most efficient option for your specific project constraints.
We will break down these self-feeding mechanics in detail. You will learn how to evaluate application fit correctly against other tooling options. We will also outline the exact technical requirements needed to prevent bit binding, equipment strain, and dangerous kickback.
The Pulling Mechanism: The threaded lead screw (gimlet point) actively pulls the bit through the wood, dictating the feed rate regardless of operator pressure.
Torque Requirements: The aggressive self-feeding nature demands high-torque, low-speed drills to prevent stalling or dangerous rotational kickback.
Application Specificity: Wood auger bits excel in deep, straight boring (e.g., timber framing, stump removal) but are overkill—and potentially destructive—for shallow or delicate finish work.
Risk Management: Clearing chip build-up (flute packing) and protecting the lead screw threads are non-negotiable for maintaining the self-feeding action.
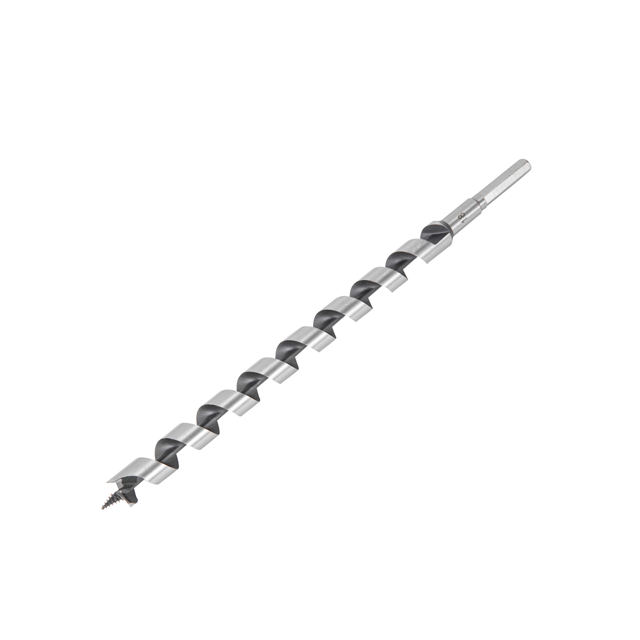
The self-feeding action of an auger bit relies entirely on a highly specialized tip geometry. Each physical component works in sequence. They turn rotational energy into downward traction. Quality Wood Auger Bits depend on this sequence to function correctly without stalling.
The primary driver of this system is the lead screw, also known as the gimlet point. It functions just like a miniature wood screw positioned right at the bit's tip. As the tool rotates, the threads bite aggressively into the timber. This generates continuous downward traction. You do not need to apply manual pushing force. The pitch angle of this screw serves as the main decision factor for feed rate. An aggressive, coarse thread pulls the bit rapidly. A fine-thread pitch provides a slower, more controlled cut.
Following the lead screw, we find the scoring spurs. Manufacturers position these sharp extensions on the outer edge of the bit head. They sever wood fibers ahead of the main cut. This precise scoring ensures a clean hole perimeter. It actively prevents ugly surface tear-out as the bit enters the material.
Right behind the spurs sits the radial cutting lip. This component performs the heavy lifting. It acts like a rotating chisel. It shaves out the main wood core from the bottom of the hole. Once it lifts the wood fibers, it feeds this waste material directly into the flutes.
Finally, the deep flutes, or flighting, handle material removal. This structure operates on the Archimedes' screw principle. The deep channels continuously eject massive volumes of waste material out of deep bores. Efficient ejection clears the cutting path. This prevents severe friction, overheating, and sudden motor stalling.
Selecting the wrong bit for your project leads to immediate problems. You will likely experience wood burning, wandering holes, or excessive physical strain. Framing your specific drilling problem correctly helps narrow down the ideal tool.
We often see users comparing auger bits directly against spade bits. Both handle rough woodboring, but their mechanics differ drastically. Augers offer a self-feeding, straight-tracking experience. They provide excellent chip clearing for deep holes measuring four inches or more. They do carry a higher upfront cost. Spade bits, conversely, rely entirely on heavy operator pressure. They are cheap and highly effective for shallow, rough-in work. However, they remain highly prone to wandering and overheating in deep timber applications.
When you evaluate Wood Auger Bits,Wood Auger Drill Bit designs against hole saws, the usage limits become clear. Augers excel at rapid bulk material removal. Yet, they remain limited by their maximum diameter, usually topping out around 1.5 to 2 inches. Hole saws dominate when you need large, shallow diameters. However, hole saws cannot efficiently clear deep waste cores. They bind up quickly in thick posts or beams.
Use a strict shortlisting logic before buying. You should specify an auger bit strictly when depth, straightness, and reduced manual feed effort rank as your primary success criteria. Do not use them for thin plywood or delicate veneers.
Comparison of Common Woodboring Tools
Tool Type | Primary Strength | Key Limitation | Best Use Case |
|---|---|---|---|
Auger Bit | Self-feeding, rapid deep boring | Requires high torque, high cost | Timber framing, stump removal |
Spade Bit | Inexpensive, fast shallow cuts | Poor chip clearing, wanders easily | Stud wall rough-ins, shallow holes |
Hole Saw | Massive diameter capabilities | Cannot clear deep wood cores | Door knob installation, large pipe pass-throughs |
The aggressive pulling mechanics dictate the power tool you must use. Because the bit pulls itself through the material, you face a high-torque reality. The drill motor must maintain sufficient power to overcome constant resistance. The cutting lip actively shears wide swaths of solid timber, demanding immense rotational force.
Drill compatibility requirements remain strict. Standard light-duty household drills will fail. You require high-amp corded drills. Alternatively, you must use 18V or 20V brushless cordless drills equipped with heavy-duty gearboxes. Furthermore, you must check your chuck specifications. Look exclusively for bits utilizing hex shanks. Round shanks will slip violently inside the chuck under extreme torque, ruining both the bit and your tool.
Safety implementation takes absolute priority due to kickback risks. If the bit hits a dense knot, hidden nail, or simply binds, the self-feeding mechanism stops instantly. The physics demand an outlet for the energy. All that rotational force transfers directly to the drill body. It then twists your wrist violently.
To implement best practices, follow these safety steps:
Use Auxiliary Handles: Always attach the long side-handle to your drill to gain physical leverage against unexpected torque.
Engage Slip Clutches: If your drill features a mechanical slip clutch, set it to disengage before the twisting force breaks your wrist.
Operate at Low RPM: High speeds create heat and increase the violence of a kickback event. Keep the drill in its lowest speed gear.
Brace Your Stance: Position your body so you can resist sudden lateral movement if the motor stalls.
Even the best bits occasionally stop pulling themselves into the wood. When this happens, users often push harder, which only exacerbates the problem. Recognizing common failure points saves your tools from premature destruction.
A stripped or dulled lead screw serves as the most frequent culprit. The delicate threads on the gimlet point can wear down easily. Hitting abrasives, rocks, or simply storing them loosely in a toolbox destroys these fine threads. Once damaged, the bit will merely spin in place. It completely loses its self-feeding capability.
Flute packing, or chip jamming, represents another massive failure point. When you drill into wet, sappy, or extremely deep timber, wood chips expand. They compress tightly inside the flutes. This creates immense lateral friction against the hole walls. It eventually halts the pulling action entirely.
Troubleshooting this requires a technique known as peck drilling. You must back the bit out of the hole periodically. Let it spin freely to clear the packed chips. Once clear, re-engage the cut. This is absolutely essential in deep bores.
Power starvation also halts the feed rate. Using a drill with inadequate torque causes the motor to stall completely. It stops before the bit's cutting lip can shave the next layer of wood. This effectively neutralizes the lead screw's traction, leaving you stuck mid-bore.
Professionals categorize these bits into two distinct families. Standard wood augers and ship augers perform differently in the field. Understanding their distinct features prevents costly project delays.
Standard wood auger bits generally focus on doweling and furniture making. They feature highly pronounced outer cutting spurs. These spurs guarantee exceptionally clean entry holes. They typically utilize a solid center shaft for maximum rigidity. You should use these for fine woodworking, timber framing, and log cabin building. They shine wherever hole finish matters deeply. However, they carry a major vulnerability. The fragile outer spurs are easily destroyed by hidden nails or screws.
Ship auger bits target construction and rough-in tasks. They omit the outer scoring spur completely. Instead, they rely on a heavier, thicker main cutting edge. They also feature wide, open flighting to clear massive chips fast. You want these for heavy utility work, deck framing, and drilling through nail-embedded wood. Their primary advantage lies in durability. They are designed specifically to cut through hidden fasteners without instantly ruining the bit head. The trade-off is that they leave a significantly rougher entry and exit hole.
The self-feeding mechanism of wood auger bits makes them the definitive choice for deep-timber boring. They successfully transfer the brutal physical workload from the operator directly to the power tool. Understanding how the lead screw drives the cutting action allows you to work smarter, not harder.
Audit your power tools for adequate torque before starting your project. We strongly recommend using an auxiliary handle to prevent injury. You must select carefully between standard and ship augers. Base this decision entirely on the likelihood of encountering hidden metal in your specific material.
Evaluate your upcoming project needs today. Check your required bit diameters and consider buying length extensions for deeper applications. Finally, acquire a specialized sharpening file to keep your lead screws and cutting lips in optimal working condition.
A: Yes, if the bit has a 1/4-inch hex shank. Impact drivers provide high torque and eliminate wrist-twisting kickback, though they drill slower and are much louder than traditional drills.
A: The deep flutes help the bit track straight naturally. Use a speed square as a visual guide or a portable drill guide attachment for exact 90-degree alignment before the lead screw engages.
A: The flutes are likely packed with chips, or you are pressing too hard. Let the lead screw dictate the feed rate; pushing forcefully can strip the threads in the wood, breaking the traction.